Pages

Monday, October 31, 2011

pumpkins with my little pumpkin

Another masking tape stencil project with the cricut : P It really takes toddler crafting to the next level! The button pushing is fun of course but she gets to use shapes and colors she wants without any having to make what she does 'look' like what it is supposed to be. Luckily my daughter doesnt have that insecurity because I think everything she does is beautiful, but I have witnessed other kids being unkind because the younger kid does 'scribbles'.... well, my opinion is there are adults who make scribbles and make a mighty fine living for it.  I imagine for many kids and parents die cut shapes do prevent frustrations and inspire. * masking tape cuts really well with depth and speed at 2 : )

Any way we procrastinated decorating pumpkins.... on hallows eve, the night before halloween, we did these : ) I had lots of ideas for pumpkin decorating this year but they just did not happen, oh well (@,@)  
Just making stencils and using black acrylic paint these turned out cute.   To make up for timing I made it halloweenie and autumnal, two birds with one stone you might say (or two squirrels with one bird ) it is a shame I procrastinated because we had a lot of pumpkins to decorate : (


My daughter Katies pumpkin turned out sooooo cute ! and well ! My relation or not, I am genuinely impressed it was done with 3 yr old hands! She's crafty already, lol. My little lady wanted very sweet things on it : )   And here she is trick or treating; she really wanted to be a cow so mommy made her costume. Do you notice the heart on her bottom? lol. There is another on her chest : ) Little man didnt want to wear the costume I made originally (grasshopper) so I made him a cowboy woody vest to match sis, but no pic here, sorry.
HAPPY HALLOWEEN!!!!!!!!!!!!!!!

Sunday, October 2, 2011

warm and cozy : )

A friend of mine is having her first baby, Yay! Got to love babies! and making stuff for them! They didnt find out the gender but she has suspicions it is a boy : P. And from her symptoms, based on my own  experience, I would guess she is having a boy too : ).  Im posting the gift I made for baby here to have a record of the project and to share the method which I personally have never seen made before, so to  me I was being original : D even as basic as it is.

What I did? I made a toddler size blanket and matching crib size (not sufficateable size) pillow with flannel and fleece.  I have never seen nor felt a blanket made out of these together But it is So soft and warm, but lightweight. I need to make one for my little girl (yes, we are havin another girl in January, Yay!).  A really great warmth factor for her November baby. Mommy and Daddy went with a bold green and dark brown in the 'nursery' so those colors were what I went for and I used the most gender neutral print I could find : )

So the process was simple. Cut the fabric,  sew the applique in place, right sides together sew the perimeter with enough left open to turn it out, opening was hand sewed (after pillow was stuffed), then I sewed on the outside (blanket only) two inches from the edge a simple stich border to prevent bunching later.  Lining up the blanket to sew the outside perimeter proved trickier than I anticipated, so beware!
The fleece has it's tendencies to stretch oddly.
And here it is, I love it, and I hope they do too! I know with mine the softer the blanket the cuddlier mommy and baby are!

Saturday, September 24, 2011

simply pretty storage

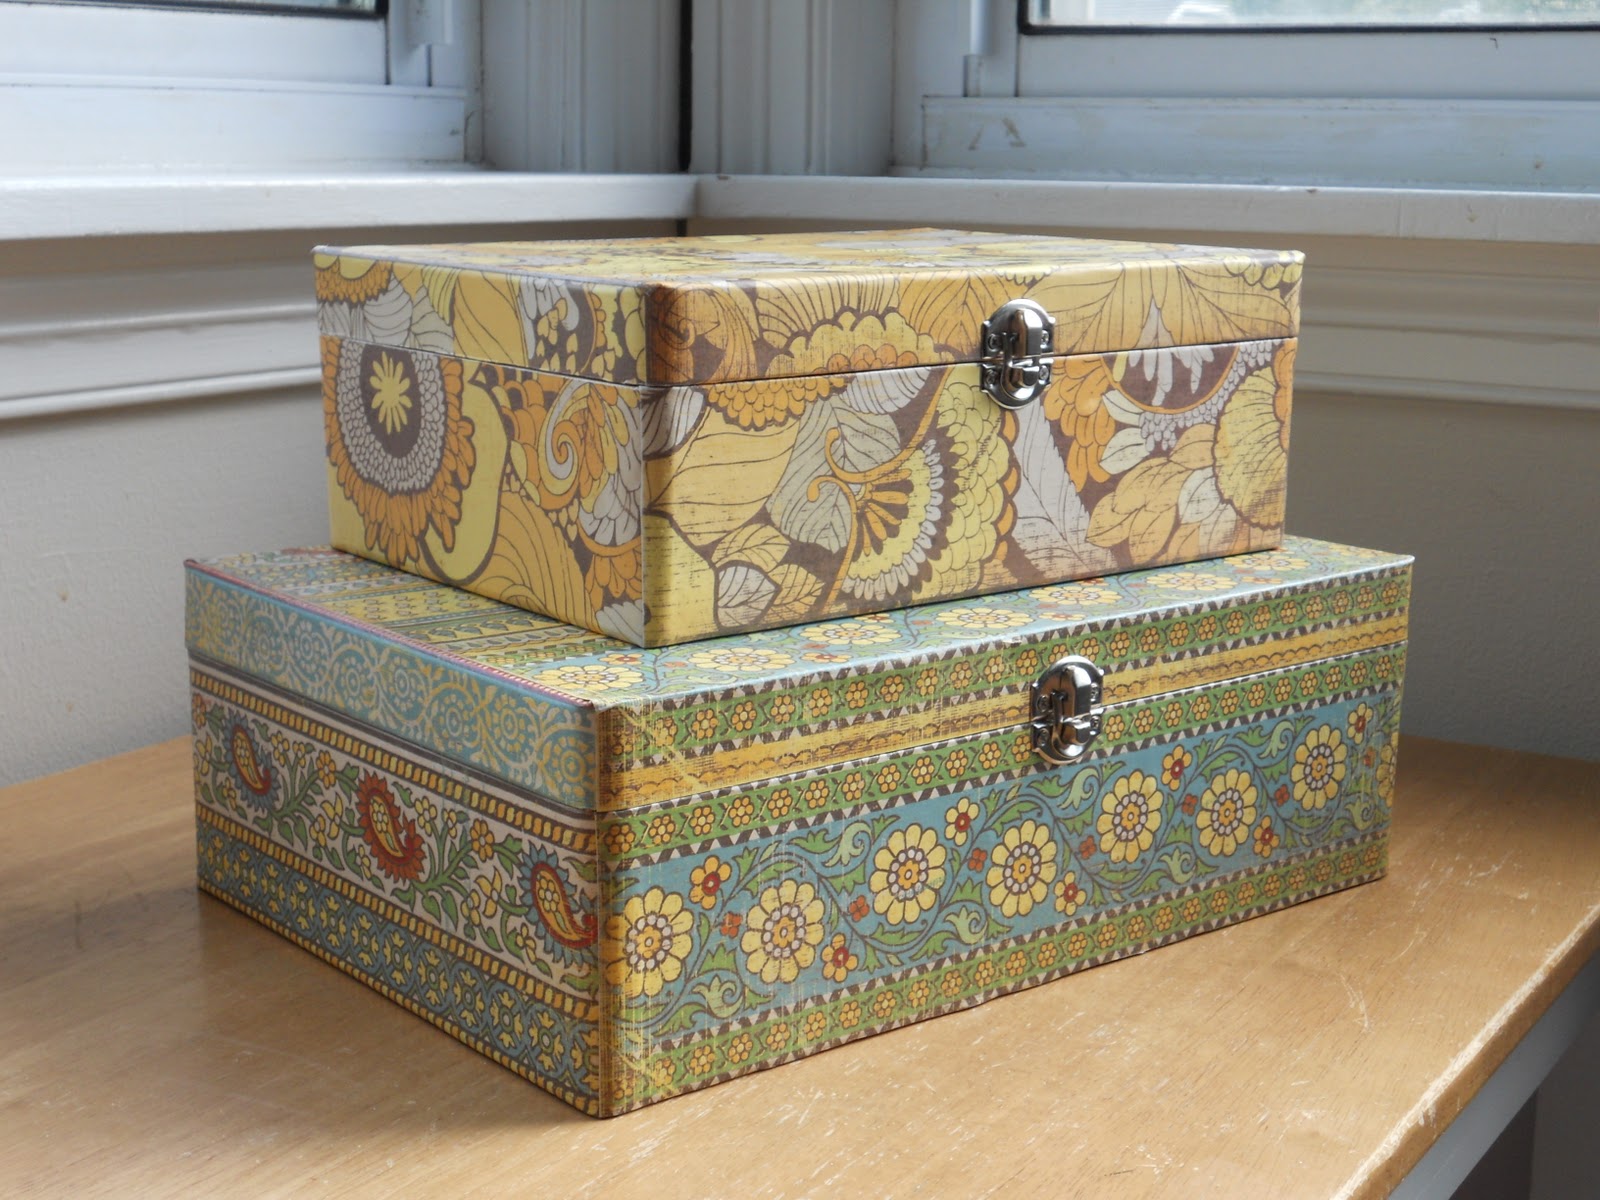
So this little project is just as the title describes. It's simple, but pretty, and useful for storage : ) & effective for coordinating decor : D. 
I had a problem in my bedroom with gaming gear. Imagine that, lol! Ahem, anyway I needed somewhere to keep the extra controllers, cables, adapters, and head sets of the sort.  We certainly are gamer dorks in my household. I thought this up and though it is super basic of an idea I wanted to share it here to show the impact and individual statement you can make in your own space with basically paper (scissors), some modge podge (paint brush), plain wooden boxes from the craft store, and a screw driver to remove and replace hardware.

I found these to be of the best size and sturdiness at my hobby lobby, and although I didnt like the handles I knew the holes of their absence wouldnt show : )


Pretty plain but they aren't actually "pretty". 
I removed the hardware but left the hinges.  That would be up to you whether you would want to or not, I had debated it but decided to leave them in the paper glueing phase. : ) The larger used three 12x12 pages and the smaller used two.  At this point (below) I replaced the hardware over the attached paper to use the same holes and not have to find them blindly.

And here is the finished set : ) Originally I was going to use use a different paper for the smaller one (one that probably matched the paper of the larger better) But I fell in love with it and couldn't help myself from using it.  It reminds me of a vintage 45 case : P ...... the yellows match and they are from the same paper pad, lol. I did coat the boxes in the end with a layer of the modge podge as a varnish of sorts and that itself intensified the colors really nicely and the paper is sealed from damage of normal use : )
Now it's your turn to express yourself. Brighten up a shelf in your home. : ) I know when I was done I wanted to do the same to every wooden box in my house! or at least paint them all bright yellow, lol.  There's a paper out there for everyone!

Wednesday, August 24, 2011

Fibonacci flora


Hello! I'm in the process of upcycling a stack of old men's t-shirts (thanks dad!)I deconstructed and reconstructed my first of them using an existing shirt, that I like the fit of, as a template (sorry for no tutorial : P ) Between opportunities to work on it I'm taking care of my 2 little ones, but I find those little breaks are great for inspiration to come in! No doubt if you follow craft blogs you have seen many "how to's" for fabric flowers, I have! BUT I have not seen one with this technique that came to me along with my favorite flower dooodle I have been doing the last year or so when coloring with my Katie bug : )

This technique uses the Fibonacci sequence. I absolutely love natures patterns and love math (im a nerd, lol). If you are unfamiliar with it, you're missing out if you dont look into it!

Below I made my plan for the petals. I used a water eraseable fabric pen. If you want to use a longer piece of fabric to have one continuous piece it's minutely easier. I used the scraps I had and found it made no difference to add the extra petal piece using the width available. It isn't important for it to be perfect but you do want the petals in the right amounts to be close in shape, and you want to progress in size : ) 1, 1, 2, 3, 5, 8, and 13 petals... if you want to go on to 21, or beyond, go for it!!!! : D


my first few petals i weaved the needle through in a simple stitch


i pulled through and went back with the needle making a loop of thread through the first few petals


then i flipped it over and began to work from the back pleating the fabric and spiraling around the base made by the start


here you see the backside completed. i personally think the back is just as pretty as the front but a daisy like flower wasnt what i was going for


the one on the left is completed with some seed beeds sewn for some dazzle : P it is after washing and drying as well. on the right you see a flower that went to 8 instead of to the 13. i also made the cuts between the petals deeper. I'm showing it here before washing because i actually liked how the ink outline looked and wanted to show you in case you would want to use permanent marker and have an outline : ) this way you could see that possibility before creating your own.


And voila! i made a smaller one going to 5 petals of equal size and sewed them to my 'new, old' shirt!


in case you wanted to see the whole upcycled shirt:


: ) i have a favorite shirt right now

Tuesday, August 2, 2011

bleached out

It's been a while since my last blog but fortunately the blogging world hasn't noticed yet, though maybe someday it would be nice if it were- when i have the time :) I've wanted to try this project for a few weeks now and have seen several examples online.... none i seen used masking tape so it left me wondering how well it would work. Masking tape has been a wonder creation for me lately! I have been having surprisingly wonderful outcomes with it for a number of recent projects. Also, I've been addicted to the new Cricut my super, amazingly kind, MIL got me.
But you can create your stencils (or buy them) cutting free-hand with scissors, printing your image or letters from the printer, using an exacto-knife, where ever your imagination takes you!! I saw on one site a woman just layed branches down on fabric and used this technique and it looked great! In other examples I seen no sort of adhesive was used at all, you could just lay your shapes down and spray. I would imagine you could just twist the garment and have a tie-dye effect. My result has 'fold' marks near the collar; they werent intentional but made it even better!

supplies:

item of clothing, piece of fabric, pillow case --- something that will respond to bleach (my shirt had a single tiny dot of a bleach mark so i knew it would go reddish)

bleach
water
spray bottle (my solution was about half bleach and half water)

card board --- to put in between shirt to prevent going through to other side just in case and for a surface to lay project on while spraying

what you will use for stenciling, if any at all, possibly some rubber bands if tie-dying


a plain, old black t-shirt i was not wearing... At All... :)


With my masking tape stencils cut with cricut machine using Florals Embellished cartridge. With experimenting I've discovered masking tape is Awesomely cut with the cricut when you have the pressure, speed, and blade depth all set to "2".


on cardboard with cardboard inserted inside ready, outside to be sprayed. Right now would be a good time to make sure you have your water bottle nozzle set for how you want it to spray, before doing the garment. I set mine to a 'mist'.
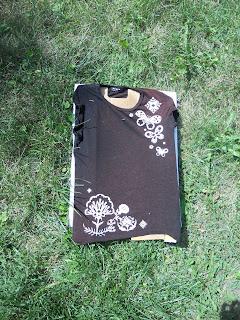

spray lightly and wait for it .........


with a moment it seems to "develop" into the fabric. i sprayed mine from the lower left and top right corners inward with a light mist 3 times at the most and got this effect. as luck would have it :) since i did spray so lightly, if you notice near the tag where my cardbord didnt cover, it did not bleed through to the outside.


And there you have it!!!!! I let it dry outside for about an hour in 95 degree weather before i moved it, but put it on right after taking it's finished pic!
It really turned out beyond expectations : ) the whole time i was cuting and applying my 'stencils' i was telling myself to have low expectations on the detail, but I got pleasantly surprised!!!! they were all there! I credit the masking tape!:)

happy crafting to you! and i have lots of ideas but not enough time or money to do them all but i hope to be sharing them here soon!
lots of love and hugs!
Btw.... we have number three on the way!!!! I had not shared that here yet so why not now! : )

Thursday, March 31, 2011

Harrison turned one! and we celebrated Sodor style : )


My baby boy turned one already! My, the year went sooooo fast!!! I'm proud of my handsome, sweet, smart little man :) He is adorable; but of course I'm supposed to think that- but it's true anyway- lol!
Well, I'm dont think my attempt at a Thomas the Tank Engine cake was as good as the Wubbzy cake.... while that was my first attempt at icing a cake, this was my second try at using an icing bag and tips. I learned it takes finess and practice (and probably more time than i could afford : P ). Also, again, I was reminded if i'm going to ice raw,cut cake chocolate isn't the best choice because crumblys show : )
Okaaaaay, i'll quit critiquing myself : P Party guests were kind in their compliments and it tasted Yummy!!!!


I was in the way of dinner making so my pictures arent the best : P also i didnt have much time the next morning before the celebration to take pictures with natural light like i wouldve liked : )

i do like making special cakes : ) maybe by the time i'm a grandma they will be fabulous, lol! i hope!

Friday, December 24, 2010

green gift wrapping

I'm pleased with myself this year for my economical gift wrapping !

By buying attractive inexpensive boxes that can be used for storage in anyone's home I minimized the need for wrapping paper (thanks IKEA!) the box gets to be part of the gift and not a landfill : )

Then by using this lovely blog tutorial : http://howaboutorange.blogspot.com/2009/10/make-gift-bow-from-magazine-page.html
I made a bunch of magazine page bows using gluestick instead of a bunch of staples (no unneccessary metal use) hope she doesnt mind my sharing! : P

My ribbon was primarily salvaged gift bows with the staple pulled off (carefully as not to tear) taped and wrapped around a tube to get the creases out. <>

Finally my gift tags are actually personalysed ornaments. I had the idea for these last year but didn't have the time. They were made with cinnamon dough and the recipe is below.


Every year since I started giving gifts as a kid I have tried to do something different in the wrapping process. Last year instead of ribbon bows I used fake poinsettias and another year I made origami stars. Thank goodness for the internet and all these ideas at our finger tips!


TO YOU AND YOURS, HAVE A WONDERFUL HOLIDAY SEASON!

or

HAPPY CHRISMANUKKAHWANZAADAN!


cinnamon dough

3/4 cup cinnamon

1 and 1/8 cup flour

1 cup salt

1 cup water

1 Tbsp. ground nutmeg (optional)
1 Tbsp. ground clove (optional)

Mix dry ingredients. Add water to form dough. Line cookie sheet with parchment paper. With fingers (because dough is very sticky!) flatten enough to use cookie cutter and pull dough from sides before lifting cutter on the parchment. Or mold your dough. Make these about 1/4 inch thick. Use a toothpick to make stringing holes. Bake in oven @ 350 F for 15-20 mins.

*if you let dough sit for a little bit it stiffens (the salt seems to dry it moderately fast) If you want white tops let air dry a little while before baking. Mine became white on top because I had to keep stopping to attend to my 8 month old... happy accident? maybe : )

**sea salt creates pretty little sparkly flecks :)