Pages

Friday, September 19, 2014

making the monster mash


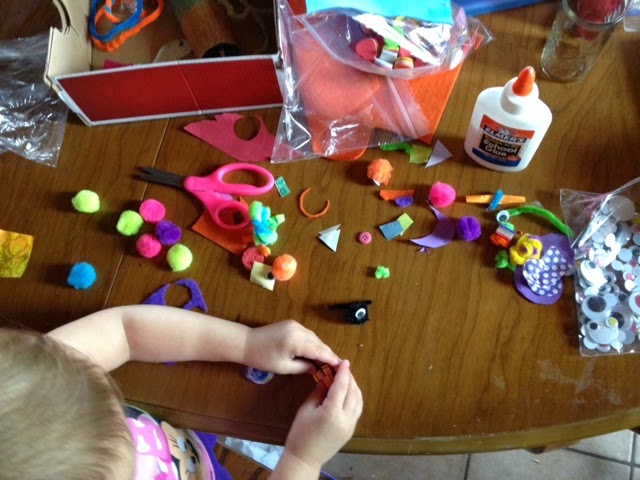
Harrison has become sooo creative, I'm so proud! In fact for a while there all he wanted to do was play on a tablet all day 😪 Then he discovered the art of origami and since then any little piece of scrap or what not has become something he 'can use for something'. Love it! A child after my own heart! He even has an obsession with storage devices like I do, lol. 😊💙 the last few weeks he's been making 'monsters' and today I got inspired to sit down with him because as he said himself 'I just see them in my head and then make 'em'. 

We used all kinds of little bits & pieces 😊: Googly eyes, foam, pipe cleaners, felt, jewels, pom poms, paper, & beads (and many I found at the dollar store).
   This just makes a great boy craft :) Katie got into it today too and Ellie likes being a monster on their creations and on craft supplies lately so it was fun for all!  He's so creative! I 💛 his little monsters he brings me with an 'I love you, mommy'! I ᏝᎭe my boy!, as he would say, 'so so so so so so soooo much!'!

Saturday, January 18, 2014

Tic tac toe, and checkers to go!


My itty bitty is turning two next week! Oh my goodness! 💜 I finally just got her weaned too. Every kid is so different, and the more you have the more apparent that becomes ☺️ I tried to gently and slowly wean like the first two, but in the end I had to cut her off cold turkey. She wouldn't taper off. Buuuuut she was ready to go off the momma milk. We were both afraid we wouldn't have as much cuddle time but now we both know we Can cuddle without the boob, lol.  I feel I did good over all! My first got 15 mos., the second 16 mos., & she got 23 mos. Now I'm going through the search for engorgement relief. So far sage has worked wonders! Do not bind your chest! :( I tried it for one day and it made my problem worse! Not a good idea, but I read it soooo many places... Grrrr.
Anyway!!!!!! I have been inspired to make some homemade toys for her birthday this year. Believe it or not she is hard to shop for! We are at a point now that we don't need any more unnecessary stuff!  Her birthday comes so close after Christmas and whatever a two yr old could really enjoy, we likely already have from the previous two 😁 This project I made 'just because', not for the bday, well just because I had the idea and it's more for the five yr old and I'm running with the inspiration 💗

This transportable 'real-life' game is equipped with checkers & tic tac toe game boards and a pocket for your pieces 😊 heehee
What you'll need:

*One piece checker board felt (or if you are super awesome a quilted board) This is measured with one inch squares
*A piece of fabric measuring 28in x 10in
* Nine 4x4 inch squares ( 5 of the same and 4 of the same; or do like I did and just use the right and wrong sides )
*Something of a strap for tieing it all up when you're little ones are done i.e. a ribbon, shoelace, rope, or a 2in x 18in strip of fabric sewn together like a strap
*Game pieces ( I made mine from just 3 types of felt )
*All Sewing is done with 1/2 inch Seams! *

✨First, sew or cut your strap.
✨Next, quilt together your 9 squares.
✨Then, affix your strap to the top of the quilt block at the edge as shown above.
✨ Cut out your checker board; they are 8x8. I cut a nine by eight square piece and folded and sewed down one side for the top edge of my pocket. I also cut with a 1/4 in excess border. But all measuring from edges was done from the line 1/4 inch inside!
if you haven't done so already cut your  28x10 piece

✨Right sides together sew the quilt block onto the larger piece so that the strap is on the inside now^^^^
✨sew the checkerboard onto the left side centered one inch from the edge leaving the top open
Now, fold in half (the short ends matching) right sides together, and sew down edge so you now have something of a tube.
✨Adjust it so the seam would lay in the middle (still inside out)
✨pin it closed and sew the top and bottom leaving an opening to turn it out. If you ever made a pillow this would seem familiar to it.
Here mine is sewed and turned out with the opening on the top left. Notice the strap is where it's supposed to be too. Careful to not sew it to something else while it's flapping about inside, when sewing your top and bottom!
✨At this point make sure it's flattened right and your edges are right to then sew a seam done the middle between the two 'boards' 
✨After that it should be safe to close your hole by hand

Then you can make/assemble your pieces! I think two separate colored buttons as checkers would be soooo cute! I just sewed a double layer of felt circles for checkers and our tic tac toe markers are cut colored felt owls that have been stiffened with modge podge.
There are so many possibilities for pieces and really they're so interchangeable ! I had not planned originally to make each of of my darlings one of these but as I was making it I was getting requests to what they wanted theirs to be like, lol! I should've known, ha! That's okay of course  :) I want them each to have their own 💜 !
I hope these directions were easy to follow ! I realize I shoud have had a pic of it sewn before turning out but I hope it still makes sense!!!! Let the games begin!!!! ☺️

Friday, December 13, 2013

Yum yum house fun Ꭷ,Ꭷ

We made graham cracker houses this year and boy was it so fun ! Even Daddy got in on the family fun ❤️ ! I didn't find the time to make actual gingerbread houses, which I've never done before anyway, but making the houses out of graham crackers was just as great 😊 & with less disappointment that could be there, if an oopsie daisy were to happen. It was extra great because I could use all the little extra cut off pieces and make each house a little different from each other structurally too.
We made our own little village 🎄💚❄️⛄️ Even the 23 month old got to join in, although she ate so much candy she was bouncing off the walls the rest of the night! She actually did 'get it' at first too, putting candy in the icing on the roof, but then got all sugar silly and more occupied with the candy and goofing. ; ) You can't do something like this and not expect a big sweep pile at the end! That's just part of the fun 💗 !  I was looking at other blogs trying to decide if I should do royal icing, hot glue, or even burnt sugar. I was mostly concerned because I knew they would have to hold strong to stand up to a 5,3, & 1 yr old! Royal icing held perfectly! I made the actually houses the previous night and we decorated the next  night ❄️ This was my first time making royal icing and made the following recipe both nights. The second night was better than the first and my lesson to share here about making it is to start with less powdered sugar and add more if needed! 

1 pound confectioners sugar
3 egg whites
1/2 teaspoon cream of tartar

In the end they were so beautiful and I was mostly surprised how wonderful my boys turned out. I guess I shouldn't have been, he ᎥᎦ  amazing!, lol! He is only 3 and rocks the minecraft better than I assume many adults do 😋 They all did great though! And it was nice quality family time. 
^ellie, harry, katie, daddy, & mommy^

I, myself, have never made an actual gingerbread house so this was new fun for me too 🎀 I think I will always make a chocolate chip cobblestone wall though! It was sooooo delicious to eat! Ha! Like a super s'more cookie, it was gooood ; )

Hope the holiday is very merry for you too! Happy Christmas ! ❤️💚❤️💚❤️


Sunday, December 8, 2013

The first December snow ❄

The firsts now of the season came before thanksgiving so it was a little early for snowflake cutting ❄💜❄

It is amazing how much Katie's change from year to year ❤! Half of those are hers, beautiful! ❄

Saturday, August 17, 2013

patchy the pillow

Arrrgh! 😊 My oldest baby begins kindergarten in just a few days, oh my! Where did the time go!? When I was in kindergarten it was only a half day, I'm going to miss her! Before we know it they'll make preschool mandatory 😕 I do wish I had it in me to homeschool but I'm not going to kid myself.... It takes a special kind of person and not me! I love teaching my children! Don't get me wrong! I'm just more the 'bonus' knowledge teacher.... The basics and socialization are better for them in the classroom 🍏 with each kid I've become more disoriented and scatter-brained, lol. Too bad that's too true! 
Anyway! Because it is a full day, after lunch they have a little rest time. So when I saw on my Katie's supply list a small pillow my mind thought instantly 'ooh, project' 😋 I don't think of where to buy one- no way! Opportunity! It never ceases to amaze me how much we can learn from our kids 💜 I've literally spent hours coordinating fabrics and when it came to letting my little lady pick some for her pillow she found a color scheme she liked and just grabbed three next to each other on the shelf. It would seem so obvious wouldn't it? But I was in shock by the ease. I think I may over complicate my life sometimes. Haha. 💕🎀 
To do this project you don't even have to buy fabric though, really! It's such a scrappy bit you use! 


To make it like mine, which is about half the size of a standard pillow, you need to cut:

*35 squares 3&1/4 inches x 3&1/4"  ( certainly you will want to make your own grid plan to personalize it unless you're playing jazz 😊 with scraps .. It's 7 squares across and 5 down)
*one rectangle 16&3/4 inches x 12&1/4 inches of back fabric or double your  35 squares and make it patchy on both sides
*stuffing of some sort, thread.... And your sewing tools ✂

These measurements are kind of odd I know but it made it the right size we needed and in the end each square is 2&1/4 inch with 1/2 inch seam allowance.
I like to give plenty of room for stitched seams to stretch so there's less a chance of a split seam in the middle of the pillow.
Here are seven vertical rows of five sewn and ironed, ready to be 
Sewn vertically and ironed again. 
Then with right sides together line up your backing, pin, and sew :) 
Leave a small gap, but big enough for your hand!, for stuffing. 
Turn right side out.
Stuff.
Pin your hole closed, edges turned inward, and sew it up.
Simple, simple, simple!

If you've looked at other posts of mine you might recognize the owl :) by happy accident I made the two coordinate. Katie picked the other 4 fabrics and I added the other two to make it more traditional not even realizing they were what I'd used before.
I can hope someday when she has a dorm or apartment or chair she'll have a sort of matchy fun pillow set. 💗💕


Monday, July 29, 2013


harry, katie, mommy


katie, harry, ellie

you're never too old for a B:r+hd@y W:$h !

 Hubby's birthday is today and since he works 2nd shift he got a morning celebration (wake up, heehee) 💗🌞💭 we love him dearly and hope he has a wonderful year ❕💠❇💫
 

And because it goes back to before we were married with children : P


Friday, July 12, 2013

ready to collect botanicals 🌾💛☀

Yesterday I took the Awesome trio for a wagon ride around the block and were graced with the sight of sooo many flowers!  What made it especially noticeable was that the flowers blooming now seem to be a variety of colors!  Sure in the spring with the first bloom there's a remarkable variety but where I live they seem to be mostly yellow. Perhaps now I'll need to pay better attention though because the color spectrum most likely is present then too!   🍂I'll stop going on now and show to you how easy it is to make your own flower presses practically for free 
💕 Each of these are made of 8 cardboard 5 inch squares stacked with pieces of wax paper folded into quarters in between, then secured with rubber bands, and that's it!  Of course they don't have to be 5 inches or even perfect, but they make for a fun day project and flora for another days art! 

Thursday, February 14, 2013

simple sweets for the simply sweet

Happy Valentines Day !
 
Hope you've been remembered today! and graced for being the Lovely person You Are! : ) And if you weren't, consider yourself My Valentine : P Years ago, i often was my only Valentine and my cat, Frank, would treat me to something nice. He was good to me : ) until i had my first baby and {out of jealousy?} I got the coldest shoulder ever! It's still cold in fact : ( i feel bad for him, he doesnt get the love from my parents (where he lives) he got from Matt and me- still doesnt really like kids though.... Any who...............
This is Kates first year of school and she has her first Valentine party! : ) oh so fun! when i was a kid it was a school day to look forward to! We made these on the cricut. She coordinated the papers and picked the shapes : ) A little more special than store bought and probably the same price {?}

and from mommy to her sweeties {minus Ellie who just got a little chocolate covered marshmallow} i made these simple little treats

some paper doilies and black lace, we are good to go! : )
We dont go crazy over here but i try to at least celebrate with the kids - make it fun - and at the same time show i love them. Because i Do So DEARLY!

And because what is Valentines Day without some Beatles? {though hubby crazily doesnt dig them? whaaat? lol}


Monday, February 11, 2013

forever yarn

Maybe I'm a little late to the game but back in November I discovered an awesome place. An awesome place called Ravelry and it is paradise for the crocheter or knitter. Am I seeming overly excited ? Maybe I am but I have a lifetime of patterns and inspiration thanks to this site! I heart it : ) my member name is mamapajama3 if you join befriend me! I have a few projects completed and I upload finished pics. This is my latest I finished last night

.

I need to get better at knitting now : )

Sunday, February 10, 2013

balloon shade

Ive grown up thinking these were hideous
 
lol
and the mention of balloon curtain or even valance made me imagine something of the sort.
 
.......but i guess im getting older, broadening my horizons, and letting my taste be swayed because i saw these :
 
and was inspired to dress up the window above my kitchen sink

I googled a tutorial and found this one as easy to understand, not too complicated, or too 'froo froo' heehee
 
Instead of having 3 panels mine is one piece with the rings sewn in place. 
I am SOOO happy with how it turned out! it does release all the way down and could look like a plain panel.  It is Very functional and believe it or not easier to operate daily than regular blinds or fiddling with drapes pushing them aside.
Loving the ease of light in the day and privacy at night... and done so delicately!
 

Saturday, February 9, 2013

torn to treasured

Ive mentioned in a previous post about my lovelies tearing up books. Sigh..... we have another victim of their 'passion for reading' - : P  Admittedly though the story was pretty thin and i got it at a thrift store for 50¢ and for the illustrations anyway : )
 
Got some bonus, beautiful fridge art though! compliments of my Katie Kat : )


and with some extra cutting and modge podge later..... a sweet planter


for my experimental garlic propagating :) below is after one week

 
and below here it is at the present: 23 days after planting a clove : ) and looking mighty dandy!


Tuesday, January 1, 2013

in the year ... 2013


   Well we are here!, not that i thought 12.21.12 was any kind of doomsday deadline : ), still going and still growing : D. I have a few resolutions this year. Now that im thinking of it, i dont think ive had a resolution in several years..... maybe since before becoming a mother!
This year i want more showers, lol, and to garden more.....
Overall,
i want to Be a Better Mother : to my children, to my pets, and to the earth : )

Here is to hoping the year is a blessed and happy one for you and yours too!!!! Happy New Year, 2013 !!!!


Since the day after christmas we've been adding red, pink, and heartsy touches for valentines day :) I am so impressed by my four yr old, katie, and her artsiness lately! Of course some of those are hers ^ She is even using the word 'kirigami' ! She's awesome! Everyday she wants to cut and glue and color... really advancing herself artistically : ) ! I have so many little paper messes to clean up but to see her being a little busy bee surrounded by paper and filling paper pads with one drawing better than the last makes my heart skip a beat : ) She's been productive this Christmas break!


And for your listening pleasure, and because i'm a geek who can't get enough science fiction or swankiness into my life.....


Thursday, May 10, 2012

(not so) puzzling paper makeover

I had the need for creativity yesterday and while my  soul wanted to create a fine piece of art my motherly responsibilities dont afford me such time : ) eventually : P. What i did do ive wanted to for a while. Another paper and modge podge revamp : D
My toddlers have been back into puzzles big time lately and  while my son is having fun with shapes,animals, and colors my daughter  has gone onto  letters and numbers :  )  She  is  going to be 4 already in just a few weeks! and already trying to spell! <(proud mommy moment)


When she was about a year and a  half we got alot of puzzles but because of her being so young some pieces  have suffered chewing.... none as bad as this number puzzle though, which also had some film layer on the surface that  was extra fun to peel off......
Some paper and  modge podge later, its life is lengthened and ready to be used by all three sweeties : )
A torn  up copy of green eggs and ham (what?! a torn up book?! kids dont do that! lol! suuuure...) even got second life in the project : ) (they really tear up  a lot of books but i cant bear not letting them look in them or throwing  away good collage material : ) <#4 traced on page

Wednesday, April 18, 2012

april art with the little lady


Katie, my  three year old, painted this the other day :) I  love the colors she chose to use! She is so artistically inclined! makes my heart feel super happy, lol


we found this wooden cutout at micheals for a little over $2! pretty sweet :) and a perfectly, nearly instant spring art/decor project for little hands
I think  she actually  may paint better with q-tips than a paintbrush : D

oh, and her hands are blueberry stained here, but she would get upset when she got paint  on them. so silly! lol!

Saturday, March 31, 2012

a spongey cake of sorts

HAPPY SECOND BIRTHDAY to my SWEET LITTLE MAN, HARRISON!
i love my little dude and can hardly believe he's only 2! Seems he's always been with us :)
spongebob and thomas are his guys!

i used marzipan here to create the features and tie, and if you're interested : ) to make the brown color for bob's pants it is :
1 blue to 2 red to 3 yellow :)

Tuesday, January 24, 2012

the greatest of gifts : )

on this day my  lovely Ellie Sophia blessed us with her presence into our family : ) 7 lbs and 18 3/4 inches : P
The love  just keeps growing!


Monday, December 19, 2011

fabric stash stockings

Last year for my sons first christmas santa left a bowl of goodies rather than filled a stocking. And katie has had a cute knit vintage, thrifted stocking santa has filled since her  first christmas.  I had found a fabric i liked last year but didn't buy it when i should have : P Apparently other people liked  it too : )  This year I didnt see any that stood out as my family.... and Santa is coming soon! also i need to be equal with the babies too : ) i did feel bad last year i didnt make any but  then again i would have made them matching ones and we didnt think we would be delightfully surprised by another on the way!

Sooooo this brings us to today and whipping some up with fabric from the scrap stash : )

Make a template of the shape you want; i almost made these like elf shoes with curled toes : P
I would give the one i created but i think it's subpar far from perfection.

For each stocking you make you'll need an inner and outet fabric

and you will cut out two from each with a total of 4 'boot' shapes
*****make sure you take into account the right side of the fabric print; you'll want to flip your template over to get a left and right : )
Pin the inner and out pieces, right sides together and stitch around the boot leaving the top open.

You  will want to cut out strips for hanging loops too!
These are roughly 7"x3" with a thick 1/2" inseam.
The top is sewn and turned out : ) bottom: just sewn.

Now after you've made your loop a left the top of the boots open you will turn them out and tuck the top in and pin closed to sew. This is for a clean finish on top and for the hanging loop. On one you will insert and pin your folded strip (loop) before sewing so when you seal the edge its in there nicely as shown above.

Here we have the two pieces we've made pinned together, outside fabric together, ready to be

Sewn


and Turned Out : )


Have a lovely holiday!!!!!!

*maybe next year ill have an update with new babys stocking or matchy ones : )

btw, hope you havent been naughty!!!!! lol

Wednesday, December 7, 2011

glitter tastes good :)

yummy  fun! we've just discovered glitter gels : )