 This was a spur of the moment project I decided I would try, and take pictures along the way, so if it was successful I could share it here : P.
I wasn't really finding prints in the store bought covers that I really liked when I did an internet search, hence the inspiration here. The ones I did like were a little more than I wanted to spend also. I had bought this unicorn flannel a few months ago because I thought it was sooo cute knowing I could use it for something, just didn't know what then. The flannel turned out to be a really great fabric for this. : )
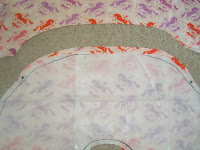
I used two peices of taped tissue paper to make to make my pattern. It's cheap and on hand : ). I traced around a cover I already had and cut it out 1/2 inch wider all the way around for the inseam. I marked the start and finish of the zipper with astericks. The bought cover actually has a piece that is roughly an inch that is in the inside of the curve; in this I thought I'd try making it simpler without that piece and am very happy with the result.
...................................................


When cutting the fabric I actually did an additional 1/2 inch wider for the zipper between the marks. This will be obvious, but you cut out two pieces, and you'll want to line up the fabric's pattern if it has one : ). The extra 1/2 inch where the zipper will be only needs to be on one of the pieces. The excess creates a flap over the zipper so if your zipper matches and you don't care if it shows, it isn't necessary.
 As I mentioned above, this was a spur of the moment project. This means I used what I had on hand, and that was a black 21 inch zipper from a past plan that never came to fruition : P. I had 1 yd of the fabric 43" wide and used about half of it. (the amount you need may vary on whether you have a print or not) The bought cover's zipper was slightly longer, about an inch or two but I figured this would help to give me some comfort space at the end of the zipper.
 As I mentioned above, this was a spur of the moment project. This means I used what I had on hand, and that was a black 21 inch zipper from a past plan that never came to fruition : P. I had 1 yd of the fabric 43" wide and used about half of it. (the amount you need may vary on whether you have a print or not) The bought cover's zipper was slightly longer, about an inch or two but I figured this would help to give me some comfort space at the end of the zipper.
Right sides together, I sewed around the case from one asterick mark to the other.
Then the zipper was sewn in one side at a time. The picture below on the right shows the gap between the zipper and the seam that will create a flap that will conceal the zipper.
....................................................


Below, left shows the excess open seam because the zipper was shorter than the bought cover.
Below, right shows it pinned for the inseam to be completed. pretty obvious, i'm sure
....................................................


Zipper in place, I sewed below each end, perpendicular to it, to have a more secure placing of the flap and zipper itself. I apologize the quality of this picture isnt great but you can see better what I mean by the right side.
 Below, left: The excess mentioned earlier is brought up higher than the zipper, pinned, and then sewn to achieve the flap concealing my unmatching zipper : ) shown on the right.
 Below, left: The excess mentioned earlier is brought up higher than the zipper, pinned, and then sewn to achieve the flap concealing my unmatching zipper : ) shown on the right.
.....................................................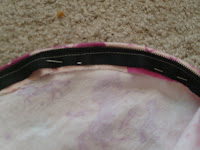


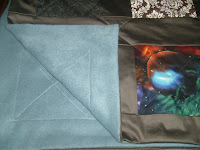
I've had an extra pillow in the bag since my daughters baby shower (2 yrs ago! :P) so now of course it's time to break it out and make a cover for my little guy : )
I've got to say I do Love these pillows!, they have really saved my bottom playing on the floor with my daughter! She likes them too, and so does our cat : ) Unfortunately the covers you can buy is really limited, but fortunately this was really simple and fairly quick : ) From start to finish it took about 2 1/2 hours, and that was pulling it from nowhere.