Pages

Friday, December 24, 2010

green gift wrapping

I'm pleased with myself this year for my economical gift wrapping !

By buying attractive inexpensive boxes that can be used for storage in anyone's home I minimized the need for wrapping paper (thanks IKEA!) the box gets to be part of the gift and not a landfill : )

Then by using this lovely blog tutorial : http://howaboutorange.blogspot.com/2009/10/make-gift-bow-from-magazine-page.html
I made a bunch of magazine page bows using gluestick instead of a bunch of staples (no unneccessary metal use) hope she doesnt mind my sharing! : P

My ribbon was primarily salvaged gift bows with the staple pulled off (carefully as not to tear) taped and wrapped around a tube to get the creases out. <>

Finally my gift tags are actually personalysed ornaments. I had the idea for these last year but didn't have the time. They were made with cinnamon dough and the recipe is below.


Every year since I started giving gifts as a kid I have tried to do something different in the wrapping process. Last year instead of ribbon bows I used fake poinsettias and another year I made origami stars. Thank goodness for the internet and all these ideas at our finger tips!


TO YOU AND YOURS, HAVE A WONDERFUL HOLIDAY SEASON!

or

HAPPY CHRISMANUKKAHWANZAADAN!


cinnamon dough

3/4 cup cinnamon

1 and 1/8 cup flour

1 cup salt

1 cup water

1 Tbsp. ground nutmeg (optional)
1 Tbsp. ground clove (optional)

Mix dry ingredients. Add water to form dough. Line cookie sheet with parchment paper. With fingers (because dough is very sticky!) flatten enough to use cookie cutter and pull dough from sides before lifting cutter on the parchment. Or mold your dough. Make these about 1/4 inch thick. Use a toothpick to make stringing holes. Bake in oven @ 350 F for 15-20 mins.

*if you let dough sit for a little bit it stiffens (the salt seems to dry it moderately fast) If you want white tops let air dry a little while before baking. Mine became white on top because I had to keep stopping to attend to my 8 month old... happy accident? maybe : )

**sea salt creates pretty little sparkly flecks :)

Tuesday, December 7, 2010

give a H(@,@)T!


Made this owl pillow today for my little girl for christmas : ) I guess to be sharing for the season maybe it should be a turtle dove or even a snow owl : P oh well! i like it! and i like it enough to share here : )

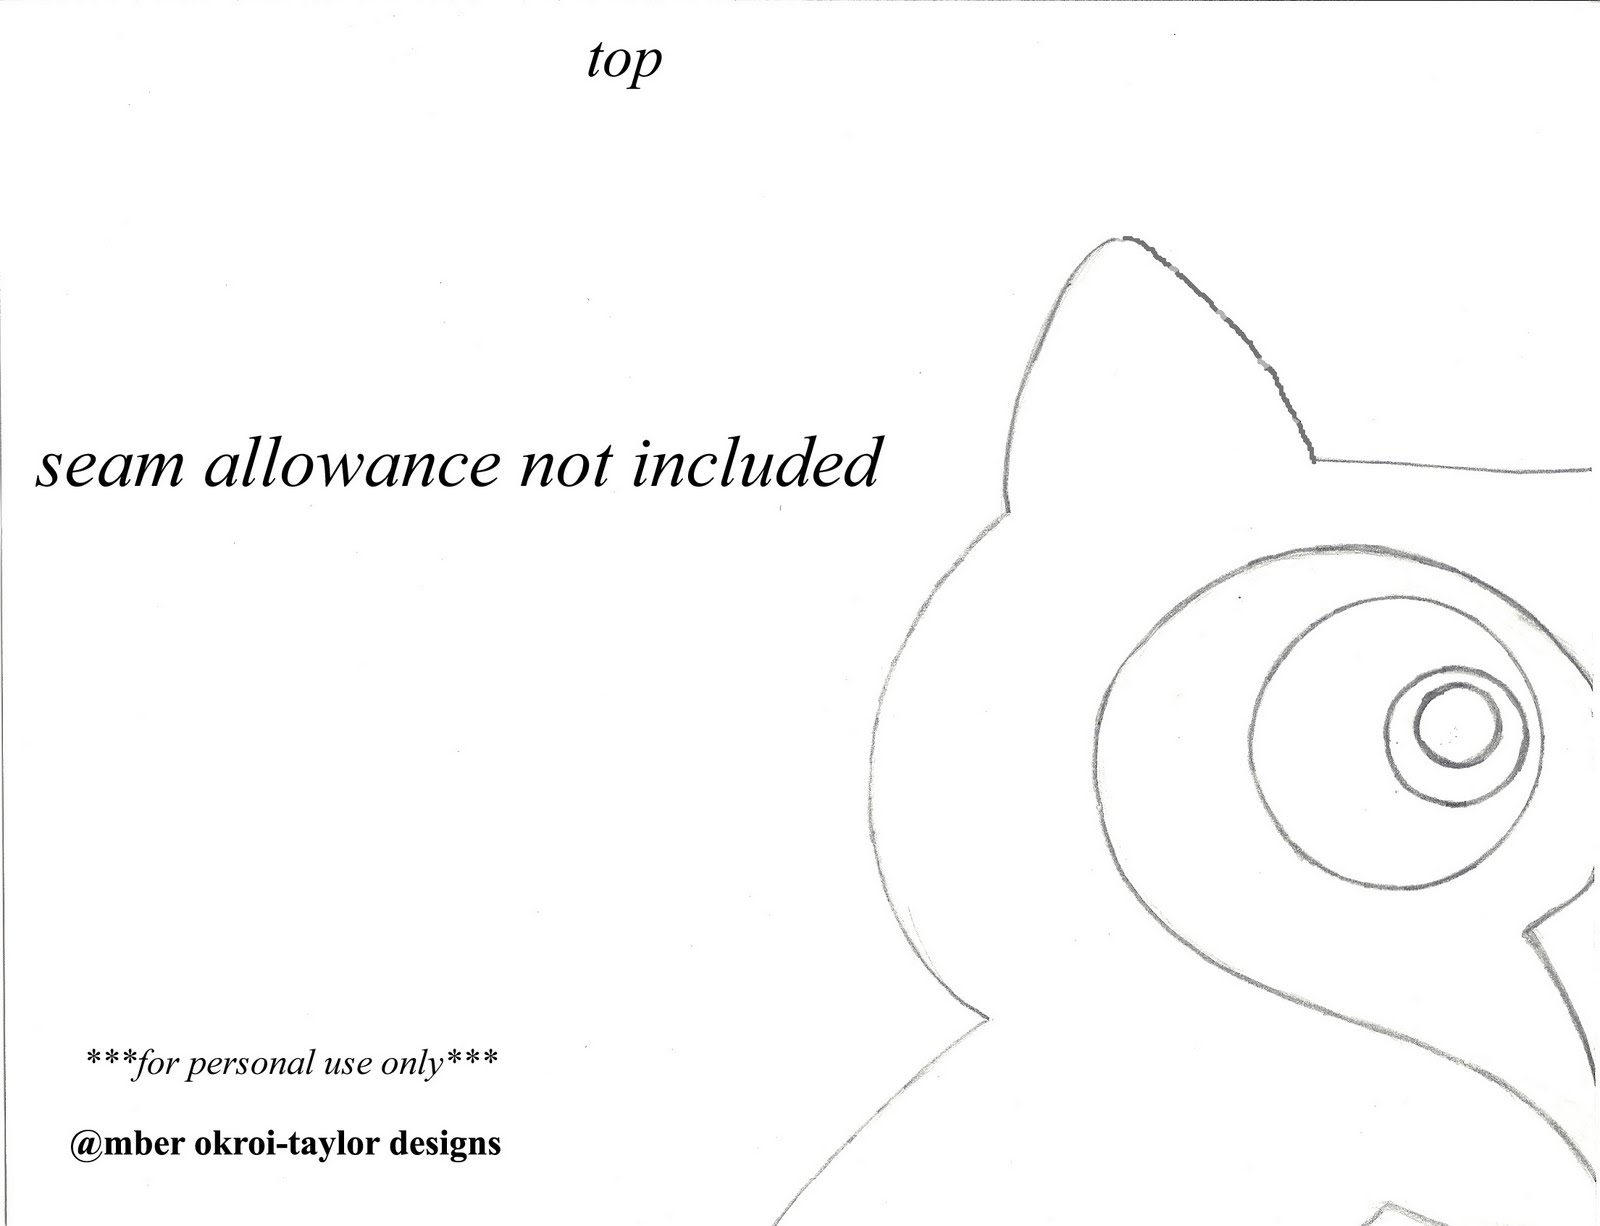
I didnt take pictures of the process for a tutorial but i've put the templates i made at the bottom of the post if you'd like to make one like this one^ I LOVE making HOMEMADE GIFTS!!!!


<>

^my own caricature of an owl : ) if i ever have my own design line ( i hope to!! ) this may very likely be my own "signature owl" i was surprised when i googled images i had not seen an owl interpretation with a heart face. i got the inspiration from the face of a baby great horned owl : ) definately suits my style : P (i need a new ink cartridge otherwise i wouldve just scanned and enlarged this image, ooooh well)
( @,@)
(),,_,,()


Templates in case you would like to make your own : ) cut with fold on right side and pieces joined together


Saturday, December 4, 2010

Thursday, December 2, 2010

and the kittens never lost their mittens

Or not again that is : ) (my little kitten lost some already this year : P) This isn't a really creative, of my own invention, project But I wanted to offer mainly just the idea here in case you haven't thought of it and how simple but helpful it is!

No doubt when you were a kid you likely had some mittens or gloves on a string inside your coat running through the sleeves so you wouldnt lose them. : ) You remember now? Well this is a 2-step project so simple and so useful!

You probably don't need a tutorial but here you are anyway! : )

What you need:
.mittens or gloves
.ribbon or yarn or skinny strip of fleece or jersey (whatever you'd like really!)
.(scissors, needle, and thread)
.and your coat to measure, unless your little kitten will kindly let you measure : P

*First: (ribbon method and simple string only)
Measure your "string" across the back of the coat with a couple inches to spare at the ends.

*Secondly:
Sew ribbon to mittens folding end in and over so it doesn't fray at the ends. : )

*Knit alternative:
If you have knit gloves I would use some coordinating yarn and with a large eyed needle poke it through, tie it off with a loop, and crochet a simple chain the length to the next mitten cut the yarn with a few inches. Pull the end through the other mitten with the needle and tie it. : ) or you could sew it on and not poke through...


( : Now let's have pie!!!!!! : ) meow, meow, meow

Tuesday, November 23, 2010

Sssssso.... cold draft ssstopper

Burrrrrr! I am cold! My apartment is soooooo drafty!, from the doors! from the windows! and my little ones want to play on the floor! Grrrrr! is more like it from this momma. But fortunately here's thisss guy delivering a HiSSSSSSS........ (well, not literally, but you get the picture) : )


And here's how you can make your own door draft stopper snake to protect you from the cold.

what you need:
.a long rectangle of fabric for the body. mine was 46" x 7" but doors come in different sizes and I trust you can use your basic math skills to decide how long and how thick you'd like it to be.

.fabric scraps for the inside of its mouth.

.fabric scrap for tongue - hopefully something that does not fray like felt

.2 buttons for eyes

.thread (scissors, small piece of paper, pen, needle, and sewing machine) : P

.rice or some other filling

} To Create {

First fold your fabric for the body in half lengthwise, then in half again lengthwise. At one end cut a curve that will be the corner of the snakes mouth to the front of its face. Unfold once so you the fabric is halved, and as you can see above on the right you will have the head shape.

Now place the body on the paper to make a template. For a seam allowance of 1/2" I put it on the edge with the corners of the snakes mouth 1/2" from the edge. Trace and cut out. Then cut two pieces for the inside of the snakes mouth. Cut a forked tongue for snakey with remaining scrap. : )


Now would be the time to sew on the eyes. (@.@) Then with the tongue centered inside the two mouth pieces sew them together with your 1/2" seam.


Now here's the tricky part. Open the body piece with right side up. Pin and sew, with the tongue down and inside, one of the matching mouth perimeters. Fold the mouth peice in half upward leaving the tongue down. Refold the body in half lengthwise right sides together. Pin and sew the second set of matching perimeters. If you start at the body fold you can continue down the side of the body in one go. ***down the body and around the mouth I used only 1/4" seam with the exception of where I tapered in.


Once you're about halfway down the length of your snake gradually taper inward going to the end until you reach it with about an inch or two open at the end. *note you want it wide enough you can pour into it your filler.
Turn out and fill ! : ) I used rice and though I think beans would work too it would be a lumpy snake, but that may be just what you want : P
After filling (which mine was solidly packed with about 6" of tail unfilled so when evenly dispersed it wasn't too hard) sew the end closed :) You could use the machine but I hand sewed and gathered to create a rounded effect when it filled.


Isn't he cute!?! Problem now is my children think it's a toy, ha ha! : P So we shall see how much door action he gets : )

please excuse my ucky apt. rug, door, and trim : )
Keep in mind you can make one of these so simply without being a snake with just a long rectangle (such as 46"x7") and it can have just as much character with a beautiful print! Express your self! I would love to see any you make too and show them! I know there are so many creative wacky print combos that would be sooooo great to see : )
BE GREEN!!!! USE LESS ENERGY! : )
Conserve even more and make one of these from something else! a pant leg, the sleeve of a big sweater, or maybe an old scarf folded in half and sewn together - if it has holes in the knit use an old t-shirt and double layer : )

I hope you enjoyed this tutorial and making thissssssss : P ... I could definately see this being stuffed with cotton too and made an actual toy. And I hope this can keep your home warmer and hearts happy in this coooooold weather! lower your energy bills too : ) even keep in the cool on hot summer days !


love our earth and reduce, reuse, and recycle : )

Wednesday, July 14, 2010

remove the stain restyling

I never got to pre-spotting this chocolate stained shirt, and now my lazyness has turned into a happy fault : ) And lesson learned: don't eat chocolate laying in bed, in the dark : P unless you want stains and a husband laughing at you (and not for the mess on the shirt but your face). I don't actually mind the latter though : D
not horrible, but not unnoticable ->

The Plan: cut out the stain and shorten sleeves to create a 3/4 sleeve V-neck out of a long sleeve crew.

the V-neck.

1st cut: your desired neck line w/a little extra for seam (unless you want a rolled/raw edge : ) the loveliness of knit!) I suggest using a v-neck you already own and like and inserting it inside the shirt and marking where you want to cut ( i used a regular pencil because it isnt white).
2nd cut: separate from the shirt with another cut the desired width of your neckline (with extra for seam).
3rd cut: from the front only of the shirt trim about 1/4 inch to 1/2 inch to achieve a gather when you sew it all back together.


I then sewed the back 'collar' to the shirt because the fabric likes to roll and to prevent a pin mess : )
I continued to pin the shirt's front neckline, inside out, until about 2 inches from the center. There I hand sewed a simple stitch to gather there, and pinned in place (i should've taken more care to do mine but it turned out okay)...... Then it was sewn shoulder to shoulder : P and the hand stitch was removed after.


then a seam was sewn around the edge, but this is optional... a rolled edge is completely acceptable with t-shirt fabric, it wont fray : )
the sleeves.
I wanted a cuffed sleeve rather than a cut off and stitched seam, or rolled cuff. to get the length i wantde i put the shirt on and folded one sleeve up to the desired length. when i took off the shirt i compared it to the other side and added about 2 inches; I used the existing sleeve end to get a straight new edge to cut . Then, the excess 2 inches was folded over (shirt is inside out) then, folded inward and pinned (fan effect).

A zig-zag/triangle stitch was used on the edge where pinned in the picture on the right shown above.
below left - unfolded after sewing
below right - turned right side out


And there you have it!!!! A much more attractive and feminine top! I don't think you need a stain to want to make a pretty top out of an otherwise boring long-sleeved tee, but it served as great inspiration for this project : )
enjoy!

btw...... i still eat chocolate in bed : )


Sunday, June 6, 2010

kooky cake

My baby girl turned 2yrs old yesterday! And she loves the show Wow Wow Wubbzy : ) He is ultra cute, I have to admit : D Last year she loved Yo Gabba Gabba, and I'm already curious what it will be next year : ) . . . I made this cake for my special girl's special day. It was a lot easier than I was anticipating. This is the first time I've ever iced a cake and only my 2nd cake ever!!! : ) So if I can do it, anyone can!

I used a 13x9 inch pan for the cake and made the limbs and tail out of rice krispy treats. http://www.wubbzy.com/ has a printable template you could use of a Wubbzy with a curly tail. It is just cake but I thought it was too small and wasted too much cake so I drew my own templates.

To make the krispy parts I laid wax paper over the templates, and wearing gloves sprayed with cooking oil, I shaped the cereal. The limbs sat over night to be stiffer and I used wooden skewers broken into a couple inches (watch for splinters!) to attach them to the cake that was cut for the ears : )

The face I did freehand, and because I couldn't find black or even chocolate decorating icing I mixed blue, green, and red and used a butter knife : P


Katie, my daughter, is so sweet she even liked her cake : ) We had cake and then opened presents and after that she wanted to see "Wubbzy" again. It made this Momma's day : D


If you'd like to make this, here are the templates I used.


unfortunately, when I saved and printed it from here it was a little smaller than it is supposed to be Wubbzy's body is supposed to be 9inches wide. But they are still here for you : )